
A full bathroom remodel usually means demo, hidden repairs, rough plumbing and electrical, waterproofing, new fixtures, finish work, and final inspection - not just tile and paint.
If you're pricing a bathroom remodel, the short answer is this: you should expect work in every part of the room, from the subfloor and wiring to the shower, vanity, fan, trim, and cleanup. With materials in stock, on-site construction typically takes 6 to 10 days, and part of the bill comes from labor behind the walls that you won't see after the job is done.
Before you compare estimates, make sure the scope covers all of these areas:
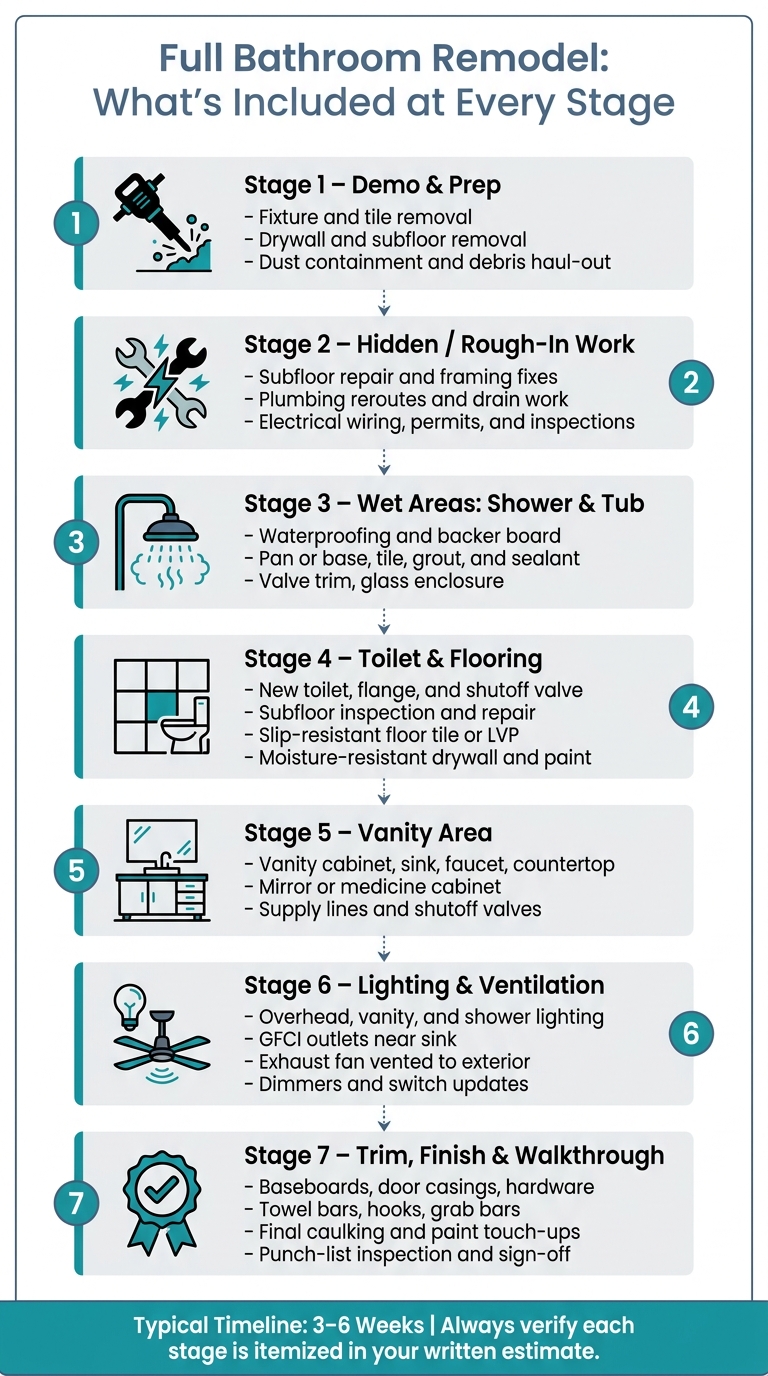
Full Bathroom Remodel: Step-by-Step Scope Checklist
| Area | What should be included |
|---|---|
| Demo | Fixture removal, tile demo, drywall removal, dust protection, debris haul-out |
| Hidden work | Subfloor repair, framing fixes, plumbing lines, drains, electrical wiring |
| Shower/Tub | Waterproofing, backer board, pan or base, tile, grout, valve trim, glass |
| Toilet | New toilet, flange, shutoff valve, supply line check |
| Flooring/Walls | Floor prep, slip-resistant flooring, moisture-resistant drywall, paint or wall tile |
| Vanity | Vanity cabinet, sink, faucet, countertop, mirror, plumbing hookups |
| Electrical/Ventilation | GFCI outlets, lighting, fan vented outside, switches or dimmers |
| Finish stage | Trim, door hardware, accessories, caulk, cleanup, final walkthrough |
In humid coastal areas and older homes, the scope can grow fast once demo starts. That is why a line-by-line checklist matters: it shows what is priced, what is missing, and where extra cost can show up.
Once the room is stripped down, the remodel shifts into demo and rough-in.
This is the part that clears the space, exposes hidden damage, and opens the way for new plumbing, wiring, and structural fixes before any finish materials go back in.
A full demo usually means removing the toilet, vanity, sink, tub or shower, tile, damaged drywall, and any rotten subfloor. If the subfloor shows rot or water damage, it needs to come out and be replaced. No shortcuts here. Covering over a bad subfloor just turns a small problem into a bigger one later.
The crew should also protect the rest of the home while this work is happening. That means dust containment and floor protection along the path in and out of the bathroom.
After demo, the team checks the framing, plumbing, and subfloor for moisture damage, mold, leaks, and framing problems before new finishes go in.
Rough-in work covers the parts you won't see once the job is done, but they matter just as much as the tile and fixtures.
That work can include wall repairs, framing corrections, blocking for grab bars or niches, and plumbing reroutes for a new layout. If the layout is changing - say the toilet or shower is moving - the supply lines and drains may need to move too.
Electrical rough-in adds wiring for lighting, GFCI outlets, exhaust fans, and heated floors before the walls are closed up. Plumbing, electrical, and structural changes often need permits and local inspections before the walls close.
Once rough-in is done, the next checklist moves to the shower, tub, toilet, flooring, and wall surfaces.
Once rough-in is done, the work moves into waterproofing and fixture install in the wet areas. This is where details matter. Good materials and careful install help protect the framing, subfloor, and walls for years.
A full shower or tub remodel usually covers waterproofing, backer board, a new pan or base, tile, grout, and the enclosure.
The crew starts by installing moisture-resistant backer board on the shower and tub walls before any tile goes up. A vapor barrier sits behind or beneath the assembly to help protect the framing and subfloor.
Next comes the shower pan or tub base, followed by valve and drain connections based on the finished fixture layout. After that, tile goes on the shower walls and floor, then grout and sealant. If the plan includes a recessed niche or a built-in bench, those pieces get framed and waterproofed during this stage too.
Glass enclosures or frameless shower doors go in last, after the tile work is complete.
A full remodel often includes:
While the area is still open, it also makes sense to check the supply line and the condition of nearby drains. That’s the right time to spot wear, leaks, or old parts before everything gets closed back up.
Before new flooring goes in, inspect the subfloor and fix any soft spots, especially near the toilet or tub base. That’s one of those unglamorous steps that saves headaches later.
Slip resistance matters on bathroom floors. Porcelain or ceramic tile with a textured surface is a common pick for wet areas. Luxury vinyl plank is another moisture-tolerant option for floors outside the shower and tub area.
For walls outside the shower, use moisture-resistant drywall, then apply moisture-resistant primer before paint. In tub and sink splash zones, tile or another water-resistant finish is the safer call.
If you're choosing grout, ask for epoxy grout. It resists moisture and staining in humid bathrooms.
From here, the remodel moves into the vanity, lighting, ventilation, and storage areas.
Once the wet area is fully waterproofed, attention moves to the vanity wall, lighting, ventilation, and storage. This is where the bathroom starts to feel finished - not just functional.
A full remodel usually includes the vanity cabinet, sink, faucet, countertop, mirror, supply lines, and the shutoff valves below the sink.
Quartz is a common countertop pick in humid bathrooms because it resists moisture and stains. For sinks, undermount and drop-in porcelain are common in full remodels. Vessel sinks and integrated solid-surface sinks are more often treated as upgrades.
A recessed medicine cabinet adds eye-level storage without using floor space. In a small bathroom, that kind of move can make a big difference.
| Feature | Standard in Full Remodel | Optional Upgrade |
|---|---|---|
| Vanity Cabinet | Pre-fabricated or semi-custom | Custom or floating vanity |
| Countertop | Solid surface or basic granite | Quartz, marble, or natural stone |
| Sink | Undermount or drop-in porcelain | Vessel or integrated solid-surface |
| Mirror | Standard framed or frameless | Smart mirror with defogging and LED lighting |
Lighting should cover the whole room, not just the ceiling. A full setup often includes overhead lighting, vanity lighting, and shower or tub lighting, with dimmers where needed.
GFCI outlets should be installed or moved near the vanity and sink where code calls for them. It’s one of those behind-the-scenes details that matters every day.
The exhaust fan needs to be properly sized and vented to the exterior. Adding a humidity sensor gives it automatic control, which helps cut down on lingering moisture after showers.
Storage works best when it matches how the room is used. A recessed medicine cabinet is a common built-in because it gives you wall storage without eating up space. Custom vanities can also include deeper drawers or modular organizers, which makes daily items easier to grab.
In larger bathrooms, a linen tower or floor-to-ceiling cabinet adds vertical storage. A floating vanity can also make the room feel more open by freeing up floor area. The goal is simple: put storage where it helps, without making the room feel cramped.
From here, the checklist moves to trim, doors, hardware, and final cleanup.
Once the tile, vanity, and fixtures are in place, the job shifts to finish carpentry and hardware. This is the stage where the room stops looking like a work zone and starts feeling done.
Baseboards and door casings are installed or replaced. Doors are rehung with new hinges and privacy hardware. Then come the last paint and sealant touch-ups that clean up the edges and pull everything together.
Accessories usually go in here too, including:
Shower doors or glass enclosures are often installed during the last few days of construction. Final caulking runs along the tub-to-wall seam, the vanity backsplash, and the baseboards. It’s small stuff on paper, but it makes a big difference in how the finished bathroom looks and holds up.
Before sign-off, every fixture and finish should be checked. That means testing the faucets, showerhead, toilet, fan, outlets, tile, grout, and glass.
Tile and grout should be inspected for cracks or uneven lines. Glass enclosures need to be checked for fit and cleaned of any protective film. The punch list is where missed details get caught, whether that’s a paint touch-up, a drawer that doesn’t close flush, or another small issue that’s easy to miss when the room is busy.
After the walkthrough, compare the written scope to what was actually included. A solid estimate should clearly spell out demolition, labor, materials, and separate allowances for tile, fixtures, cabinetry, counters, lighting, and ventilation.
If any of those categories are missing, or if several are rolled into one vague line item, ask about it before work starts. That's often where budget problems begin. OC Home Services itemizes each allowance on its bathroom remodeling estimates for exactly this reason, so homeowners can see where every dollar is going before demolition starts.
Vague allowances are a common source of surprise costs. The more specific the scope, the easier it is to compare proposals side by side and check the finished job against a clear standard at the end.
Once demolition begins, the budget can change. Bathrooms hide problems well, and some of them don't show up until walls are open or flooring comes out. Water damage, mold, old wiring, or framing issues behind the walls can all add cost fast.
The same goes for scope changes. If you move plumbing fixtures, update electrical circuits to meet code, or pick custom features and higher-end materials, the price can climb.
Set aside 10% to 15% of your budget for contingencies. That buffer gives you room to deal with surprises without blowing up the whole project.
Yes - most of the time, especially in the Delmarva area if your remodel includes plumbing, electrical, or structural changes. Permits and inspections help make sure the work meets local building codes and safety standards.
Permit and inspection costs often range from $500 to $2,000, depending on the scope of the project and where the home is located. In many cases, a licensed contractor handles the permit paperwork and schedules the required inspections.
Compare estimates line by line - not just by the total at the bottom.
A solid quote should show itemized costs so you can see where the money is going. Labor, demolition, and materials should be broken out. You should also see allowances for tile, fixtures, cabinetry, counters, lighting, and ventilation.
That matters because two bids can look close on price while covering very different work. One contractor may include better materials or more prep. Another may leave out parts of the job you assumed were included.
Look closely at scope, too. If the remodel may involve framing repairs, subfloor work, plumbing changes, or other behind-the-wall fixes, the estimate should say so and explain how those issues will be handled.
Before you sign anything, confirm the contractor is licensed and insured. And if you're working on an older home, set aside a 10–15% contingency for hidden problems once demolition starts.
