
The first things contractors check first before a bathroom remodel are access, slip risk, shower entry, wall support, and moisture damage.
If your bathroom has a door opening under 32 inches, a tub with a high step-over, slick flooring, weak wall framing, or poor exhaust, those issues usually get checked before tile, paint, or fixture style. In most aging-in-place remodels, the main targets are simple: 32-inch clear opening minimum, 36 inches preferred, 30 inches of front clearance at key fixtures, and a 60-inch turning circle if wheelchair use is part of the plan.
Before design starts, homeowners should expect a contractor to review:
Here’s the short answer: safe layout comes first, wet-zone safety comes second, and behind-the-wall checks come third. That order helps cut change orders, surprise framing work, and moisture problems later.
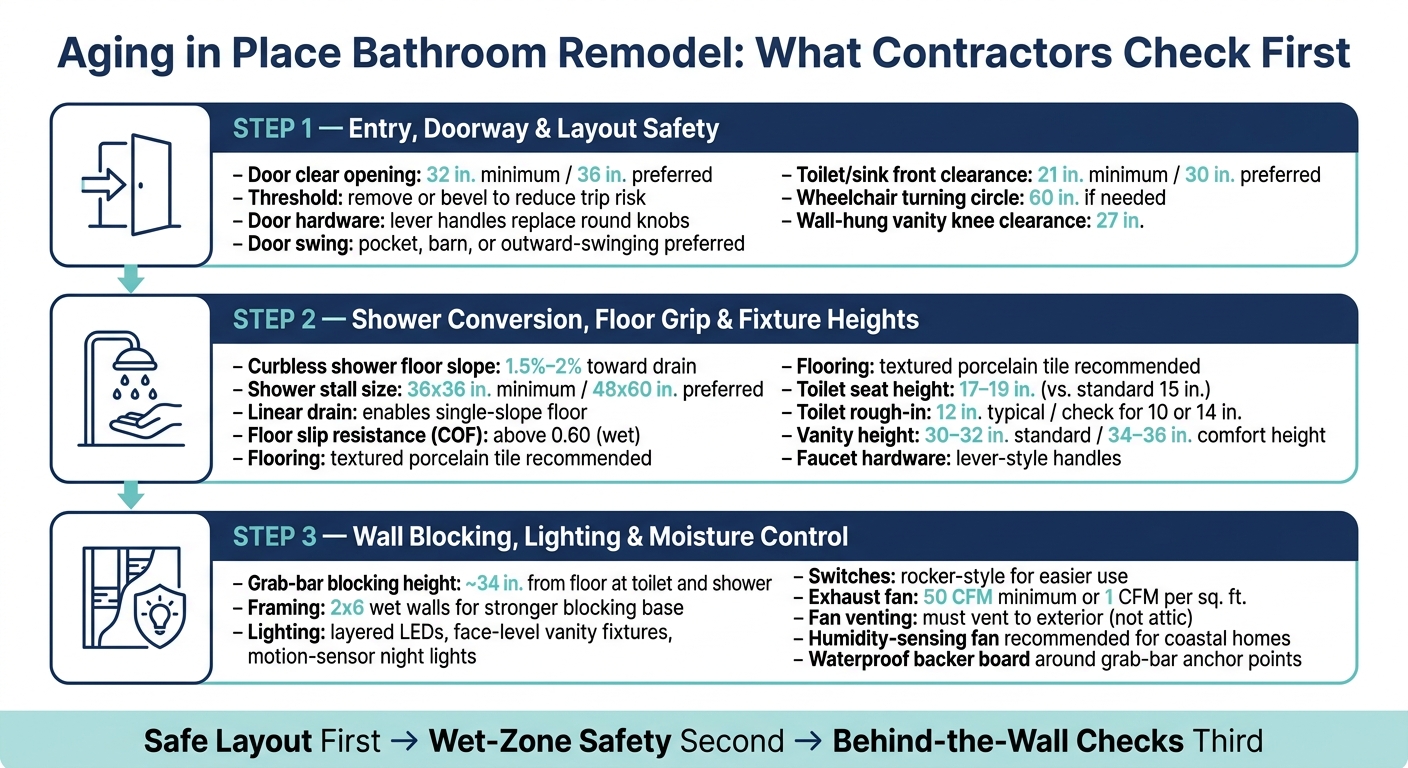
Aging in Place Bathroom Remodel: 3-Step Contractor Inspection Checklist
| Check area | What gets checked first | Target or baseline |
|---|---|---|
| Entry | Clear door opening | 32 in. minimum, 36 in. preferred |
| Layout | Space in front of toilet/sink | 21 in. minimum, 30 in. preferred |
| Mobility | Turning room | 60 in. circle if needed |
| Shower | Curbless fit, drain, slope | 1.5%–2% slope to drain |
| Shower size | Stall size | 36x36 in. minimum, 48x60 in. often fits better |
| Floor | Wet slip resistance | COF above 0.60 |
| Toilet | Seat height | 17–19 in. for easier use |
| Vanity | Seated access | 27 in. knee clearance |
| Ventilation | Fan size | 50 CFM minimum or 1 CFM per sq. ft. |
| Wall support | Grab-bar backing | Blocking at toilet and shower areas |
The rest of the article breaks down how contractors check each area and what those findings usually mean for your remodel scope, cost, and build plan.
Contractors start at the entry for a simple reason: if access is tight, the room may not work without bigger changes. After that, they check the door swing and the space around each fixture.
A 32-inch clear opening is the minimum code-compliant width. 36 inches is the better target for day-to-day comfort and wheelchair access.
They also check the threshold at the entry. A raised threshold can turn into a trip point fast, so it should be reduced or removed when possible. If a transition has to stay, a beveled threshold strip is the safer fallback. Round doorknobs usually get swapped for lever handles since they’re easier to grip.
Door swing matters more than people think. An inward-swinging door can block access at the worst time, especially if someone needs help and can’t move away from the door. That’s why pocket doors, barn doors, or outward-swinging doors are often the better fit.
From there, contractors measure the clear floor space around the fixtures. The code minimum in front of the toilet is 21 inches, but 30 inches is the better target for aging-in-place use. The same numbers apply in front of a sink or vanity: 21 inches minimum, 30 inches for easier daily use. If wheelchair maneuvering is part of the plan, the layout should allow a 60-inch turning circle somewhere in the room.
If the bathroom clears those spacing checks, the next move is the shower area and wet-zone safety.
When the clearances don’t work, contractors test the layout before demolition starts. That may mean moving the vanity, shifting the toilet, or widening the doorway to make the room usable without forcing awkward workarounds later.
A wall-hung vanity can help here too, since it can provide 27 inches of knee clearance for seated use. If the fix involves structural work, the contractor needs a valid Maryland Home Improvement Commission (MHIC) license.
These early layout calls shape every safety upgrade that comes next.
Once entry clearances are set, contractors usually look at three things next: shower access, wet-floor grip, and fixture height.
The first check is pretty simple: drain location, subfloor condition, and wall framing.
A curbless shower needs the floor to slope 1.5% to 2% toward the drain. If the subfloor can't be recessed or built up enough to hit that pitch, the job gets tougher fast. In slab homes, moving the drain often means trenching the slab, which adds cost and labor.
Contractors also look at the plumbing wall to see whether there's enough depth for the drain and vent lines. If the framing is undersized, they'll flag that before any layout choices get locked in.
When a curbless conversion does make sense, contractors often suggest a linear drain along one wall. That setup allows a single-slope floor, which is easier to build and easier to use. Code allows a 36x36-inch stall as the minimum, but 48x60 inches is usually a better working size for a curbless walk-in. They also check for a handheld showerhead and simple controls so the space works whether someone is seated or standing.
Once the shower layout works, attention shifts to the part people feel right away: how the floor performs when it's wet.
Contractors check slip resistance with the floor wet, not just dry. The main measure here is the coefficient of friction (COF), and anything above 0.60 is the recommended threshold for bathroom flooring.
In humid coastal homes, textured porcelain tile is often a smart pick. It takes in very little water and doesn't need the sealing that natural stone often calls for. Smaller-format tiles can help too, since the extra grout lines add traction in wet zones.
After the floor is sorted out, contractors move to the fixtures people use every day.
A standard toilet sits about 15 inches from the floor to the seat. Taller models sit at 17 to 19 inches, which makes sitting down and standing up easier for aging-in-place use. That may sound like a small change, but over time it can make daily use much less tiring.
Before suggesting a replacement, contractors measure the rough-in distance. In most homes, that's 12 inches from the wall to the drain center, though older houses sometimes have 10-inch or 14-inch setups. That one measurement decides which taller models will actually fit the plumbing that's already there.
Vanities usually run 30 to 32 inches high. Comfort-height models are 34 to 36 inches. If wheelchair access is part of the plan, a wall-hung or floating vanity is often the better option because it gives the 27 inches of knee clearance needed for seated use. Contractors also check the faucet hardware. Lever-style handles are easier to use for people with limited grip strength.
Next, contractors review grab-bar blocking, lighting, and ventilation, because those details shape how safe the room stays after installation.
Once layout, shower access, and floor grip are locked in, the next check happens behind the scenes. These are the parts you won’t notice in a rendering, but they have a direct impact on day-to-day safety and how well the bathroom holds up over time.
With the layout set, contractors verify that the wall structure can handle daily use. A grab bar is only as strong as what it’s fastened into.
That’s why they plan solid blocking between studs before the walls are closed up, usually around 34 inches from the floor near the toilet, at the shower entry, and inside the shower. If the remodel uses 2x6 framing on wet walls, that extra depth can give blocking a stronger base. During framing, contractors check that the blocking is in place before the walls are sealed.
After framing support is confirmed, attention shifts to visibility.
Contractors look for dim hallways and bathrooms, shadows around the vanity, and low contrast between surfaces that makes edges harder to see. Usual fixes include layered lighting, face-level LED vanity fixtures, and motion-sensor night lights for safer movement after dark. High-contrast finishes also help define edges more clearly.
Rocker switches are easier to use than flip switches for people with limited grip or arthritis.
The aim is simple: a room that’s easier to move through, easier to clean, and safer to use every day.
In coastal areas, humidity isn’t a small issue. It puts steady pressure on the room, so ventilation becomes a durability check as much as a comfort one.
Contractors verify that the exhaust fan is sized for the room and vented straight to the exterior. Venting into the attic is a common mistake, and it can lead to mold and long-term damage. A humidity-sensing exhaust fan can help control moisture in high-humidity coastal climates. Contractors also confirm that the fan vents outdoors and that moisture-resistant backer board plus waterproofing protect the framing around grab-bar anchor points.
An aging-in-place bathroom remodel starts with the inspection, not the finishes. That first walkthrough should follow a clear order: access first, then wet-zone safety, then the hidden issues behind the walls and under the floor.
Start with the parts that affect safety and function every single day. That means safe access, a curbless shower, slip-resistant flooring, proper fixture heights, grab-bar blocking, layered lighting, and solid ventilation. Those choices aren't surface-level upgrades. They're build decisions. They need to be set before the walls are closed and the tile goes in.
If you skip them during planning, there's a good chance you'll pay for it later by opening finished work back up. That's why a 10% to 20% budget buffer matters. Demolition has a way of telling the truth.
Homeowners who understand that sequence before they sit down with a contractor tend to ask better questions. They also avoid expensive change orders and end up with a bathroom that lasts for years, not one that only looks good on final walkthrough day.
For coastal homes, this matters even more. Moisture and aging materials can shift the scope in a hurry.
OC Home Services is an MHIC-licensed home improvement company based in Salisbury, MD, serving Maryland's Eastern Shore and southern Delaware. The team brings decades of trade experience in bathroom remodeling for older homes and condos, with close attention to moisture control in coastal settings - starting with the same inspection priorities covered above.
It depends on your location and the scope of the remodel. In Ocean City, Maryland, a building permit is required for bath conversions.
Bathroom projects often involve plumbing, electrical, or structural changes. That’s why professional contractors usually review local building codes before any work starts. The safe move is to check with your local building department or a licensed contractor to confirm the permit rules for your project.
Yes. Even a small bathroom can work well for aging in place. The key is making the layout do more with less space.
A few changes make the biggest difference. Replacing a standard swinging door with a pocket door or barn door frees up room right away. Swapping a bulky tub for a curbless walk-in shower opens the floor plan and cuts down on tripping risk.
Fixtures matter too. Comfort-height toilets, wall-hung vanities, lever-style faucets, and well-placed reinforced grab bars can make a tight bathroom safer and easier to use without making it feel cramped.
Hidden problems often show up only after the walls come open. That’s when costs can climb in an aging-in-place remodel.
The usual trouble spots are pretty common in older homes: outdated plumbing, electrical work that no longer meets current code, and water damage that leads to dry rot in wall studs or the subfloor. On paper, a remodel can look simple. Once demolition starts, it can turn into a different job.
Older homes may also have lead paint or asbestos. Those aren’t DIY fixes. They require legal abatement, which adds time and cost to the project.
Because of that, experts often suggest setting aside a 10% to 20% contingency fund for surprise structural and safety repairs.
