
A kitchen island only makes sense if your kitchen has the space, the layout, and the budget to support it.
Before you commit, you need to check four things: clearance, function, utility work, and permits. If you cannot keep about 42 inches of aisle space, the island will make the kitchen harder to use. If you want a sink, dishwasher, microwave, or cooktop in the island, the job can shift from a cabinet upgrade to electrical, plumbing, venting, flooring repair, inspections, and extra downtime.
Here’s the short answer:
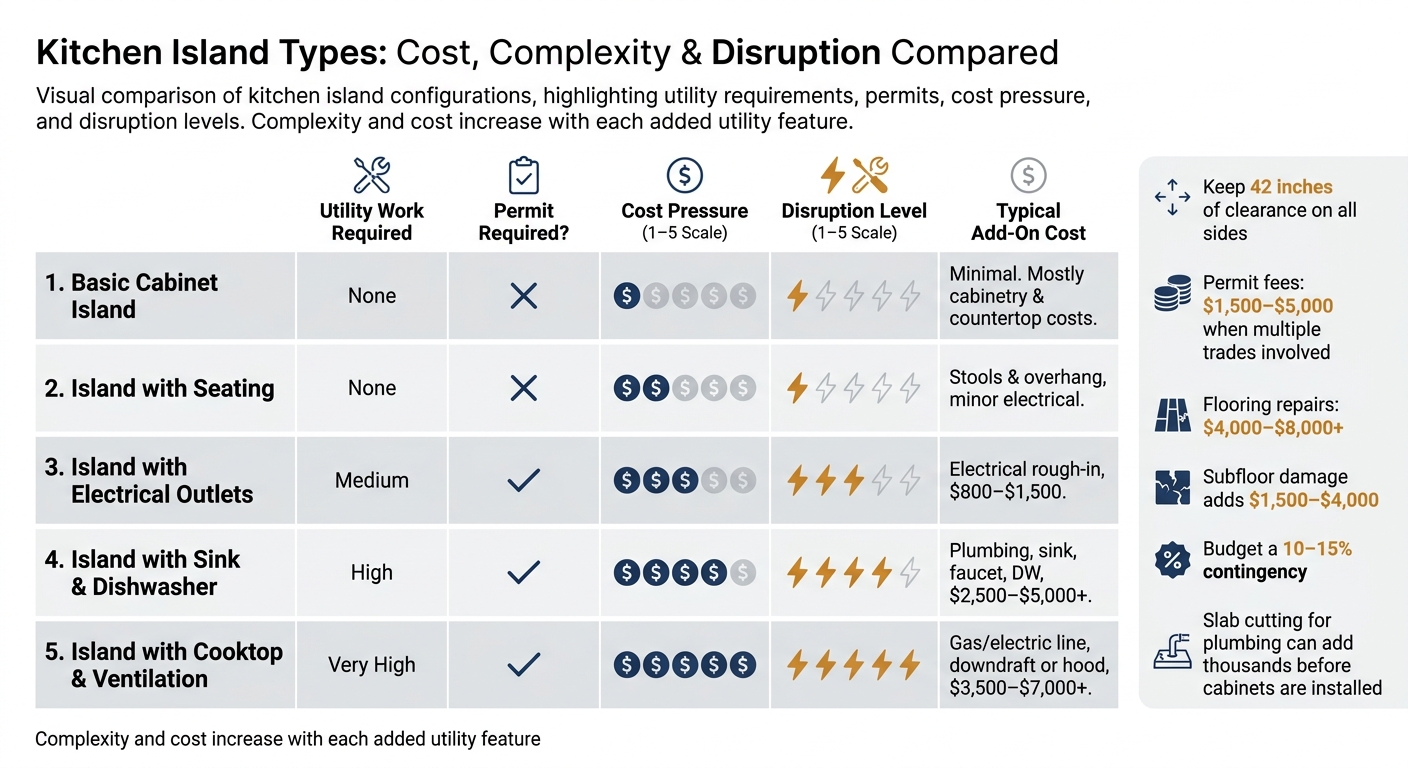
Kitchen Island Types: Cost, Complexity & Disruption Compared
| Island Type | Space Impact | Utility Work | Permit Risk | Cost Pressure | Disruption |
|---|---|---|---|---|---|
| Basic cabinet island | Low | None | Low | Lower | Low |
| Island with seating | Medium | None | Low | Lower to mid | Low |
| Island with outlets | Medium | Electrical | Yes | Mid | Medium |
| Island with sink/dishwasher | High | Plumbing + electrical | Yes | High | High |
| Island with cooktop | High | Electrical + venting + structure | Yes | Highest | Highest |
If your kitchen can hold the island without hurting traffic flow, and if the island solves a daily problem like prep space, storage, or seating, the project may be worth doing. If not, a peninsula or layout change may fit the room better.
Start with the tape measure. If your kitchen can't handle the footprint, the island isn't happening.
A lot of older Delmarva homes have compact kitchens that were never built around an island. That's not a flaw. It's just the reality of the layout, and it needs to be checked before anyone starts sketching ideas.
Clearance is where this decision gets made. Keep at least 36 inches of space, 42 inches for a one-cook kitchen, and 48 inches for two cooks. Open appliance doors also can't block the walkway or interfere with another appliance.
Seating changes the math fast. A few stools may sound simple, but they add depth, and in a small kitchen, that often eats into circulation.
If an island pinches the walkway or makes appliances harder to use, a peninsula tends to be the better fit. Same idea if traffic paths cross each other. Fix the circulation first, then decide what job the island needs to do.
Once the clearances work, you can move on to the island's actual purpose.
Once the clearances work, the next step is simple: decide what the island needs to do. That choice drives the size, the overhang, and whether you’re bringing in plumbing or electrical.
Most islands land in one of four roles, and each one changes the build in a different way.
| Island Job | What It Needs | Key Tradeoff |
|---|---|---|
| Prep space | Large flat surface, butcher block or quartz | Keeps the work surface open and central |
| Seating | 12"–15" countertop overhang | Adds depth and reduces circulation room |
| Storage | Deep drawers, pull-outs, custom cabinetry | Increases complexity and cabinet lead time |
| Cleanup | Sink, dishwasher, garbage disposal | Requires plumbing, drain routing, and dedicated electrical circuits |
A prep-only island is often the easiest path because it skips utility work. The moment you add utilities, the job moves beyond cabinets and countertops into rough-ins.
Seating sounds simple, but it takes up space fast. A 12"–15" overhang gives people room to sit, but it also pushes the island deeper and eats into walking space. Storage can be a great use of the footprint, though deep drawers, pull-outs, and custom cabinetry usually mean more build time.
Cleanup islands come with the most moving parts. Add a sink or dishwasher, and you’re usually dealing with plumbing, drain lines, and permits. Define the island’s main job first. That one call shapes the layout and the budget.
Island appliances are handy. They also add work behind the scenes.
A sink or dishwasher needs proper drain routing. In slab-on-grade homes, that can mean core-drilling or saw-cutting the concrete slab to get the right slope. That’s not a small change. It affects labor, timeline, and cost.
A built-in microwave needs a dedicated 20-amp circuit. That should be planned early, not squeezed in after cabinet drawings are done. And before you lock in any appliance location, map every door and drawer swing. On paper, a layout can look fine. In the room, one open dishwasher door can block a trash pull-out or corner cabinet.
A cooktop is the hardest one to place in an island. It needs a range hood vented straight to the exterior, and if that hood is rated above 400 CFM, makeup air provisions may also be required. That’s where a clean-looking design can run into code and venting issues fast.
In older Delmarva homes, the island has to work with what the house already has, not just what looks good on a plan. Existing wiring, panel capacity, and moisture exposure all matter. Durable, moisture-resistant finishes and hardware make more sense here, especially in homes that see heavy use or periods of vacancy.
Electrical service is another early checkpoint. If the panel is undersized, an upgrade from 100 amps to 200 amps may be needed to support modern island appliances and the code-required dedicated 20-amp circuits. It’s much better to find that out before the design is finalized than after cabinets are ordered.
Once you know what the island needs to do, plan the rough-ins early. That step shapes cost, timing, and layout more than most people expect. Electrical, plumbing, and ventilation work all need to be figured out before cabinets, countertops, and finish materials close everything up.
Electrical work is one of the first places island plans get more involved.
Island receptacles must be GFCI-protected and tamper-resistant, and larger islands may need more than one receptacle to meet spacing rules. If you're adding appliances, each one usually needs its own dedicated circuit. A built-in microwave typically needs a 20-amp circuit, a dishwasher needs a separate 20-amp circuit, and a garbage disposal also needs its own 20-amp circuit.
Lighting has its own rules too. Island lighting needs to be on a separate circuit from the countertop receptacles. And if the home's electrical panel is already maxed out, an upgrade may be needed. That can change the budget fast.
In Maryland, check that your contractor has valid MHIC licensing before utility work begins.
If the island will have a sink or dishwasher, the plumbing rough-in has to happen before flooring and cabinetry go in. Miss that window, and the job gets harder and more expensive.
In slab homes, this can mean saw-cutting or core-drilling the concrete so drain lines can run back to the nearest drain connection at the right slope. That's not small work. It's messy, labor-heavy, and very hard to undo once the kitchen is finished.
A dishwasher also typically requires an air gap at the countertop or sink rim.
An island cooktop adds a whole new layer to the project.
A range hood above an island cooktop must vent to the exterior through metal ductwork. Venting into an attic or wall cavity is a code violation. Put simply, if the island includes a cooktop, you need an exterior-vented hood and a duct path that works with the house structure.
That one choice affects framing, ceiling work, duct routing, and finish details. In many kitchens, these rough-ins end up setting the rest of the budget and the path for the finish work.
Once the rough-in plan is set, the next wave of costs usually comes from flooring, permits, lighting, and the simple fact that your kitchen may be out of commission for a while.
Flooring catches a lot of people off guard. Add an island, and suddenly the new footprint and utility cuts can force a bigger flooring decision: patch around the island or replace the full floor so everything matches. That sounds simple on paper. In practice, it rarely is. Tile patterns get discontinued, hardwood changes from batch to batch, and LVP can help connect old and new sections at a lower cost.
For a mid-range kitchen, flooring often lands in the $4,000 to $8,000 range. If the subfloor has hidden damage, that can add another $1,500 to $4,000. In homes built before 1960, removing old flooring can also expose asbestos in tile or adhesive. If that happens, professional abatement has to happen before new flooring goes in.
Lighting is another line item that tends to grow. Pendant lights over the island and new outlets should be part of the budget from the start, especially since both can trigger permits and inspections.
After flooring, timing becomes the next big issue. Permits and inspections don't just affect cost. They can steer the whole schedule.
Electrical, plumbing, and gas work usually need permits and inspections. Rough-ins must be inspected and approved before floors are closed up or walls are patched. Skip that step, and you may end up reopening finished work later, which is the kind of setback nobody wants. For a kitchen remodel that involves more than one trade, permit fees often run $1,500 to $5,000.
If you're working on an Eastern Shore rental and need the kitchen ready by Memorial Day, file permits well before spring. Plan review can take 2 to 6 weeks, and licensed plumbers and electricians are often booked 1 to 3 weeks out.
The more jobs the island takes on, the more the budget and disruption tend to rise.
| Island Configuration | Utility Complexity | Permit Required? | Disruption |
|---|---|---|---|
| Basic cabinet island | None | Low | Minimal |
| With seating overhang | None | Low | Minimal |
| With electrical outlets | Medium (wiring) | Yes | Moderate |
| With sink & dishwasher | High (drain/supply lines) | Required | High - may require slab cutting |
| With cooktop & ventilation | Very high (ducting, ceiling work, structure) | Required | Highest |
Every added feature - outlets, a sink, or a cooktop - pushes up cost, inspections, and downtime. A 10–15% contingency on top of the planned budget is a smart cushion for subfloor problems, old wiring, or code upgrades that only show up once demolition starts.
After you’ve checked space, function, and budget, one last call remains: will the island make the kitchen easier to use every day, or just take up room?
An island earns its place when the kitchen can handle it and when it fixes a day-to-day problem. If you can keep at least 42 inches of clearance on all sides of the proposed island, you’re starting from a good baseline.
From there, the best reason to add one is simple: it fills a gap you feel all the time. Maybe prep space is tight. Maybe there’s nowhere for people to sit without getting in the cook’s way. Maybe cabinet storage is always maxed out. That’s when an island starts to make sense.
If the layout can’t keep 42 inches around the island, that’s the stopping point. No amount of wishful thinking fixes a cramped kitchen. If doors already swing into walk paths or people already bump into each other, the island will make that worse.
Utilities are where a lot of island plans get expensive fast. A sink in an island can sound simple on paper. In a slab-on-grade home, though, cutting into the slab and moving plumbing can add thousands of dollars before the cabinets are even installed . The same thing happens when a gas line has to move, or when plumbing has to run far from the nearest wall chase. What looked like a basic cabinet project can turn into a much bigger remodel.
The right island fits the room, handles a clear job, and stays inside the budget. Start with clearance measurements. Then decide what the island is supposed to do - prep, seating, storage, or some mix of the three. After that, let utility work and finish choices follow that plan.
OC Home Services builds this same clearance-first process into every kitchen remodel it plans on the Eastern Shore. If it can't meet those limits, it's not the right island for that kitchen.
Kitchen island size usually comes down to two things: clearance and how you plan to use it.
Start with the walk space first. Plan for at least 36 inches between counter runs, or 42 inches in a two-cook kitchen, so the island doesn't choke off traffic. That spacing matters more than people think. A big island looks great on paper, but if it turns the kitchen into a squeeze point, it's the wrong fit.
Utility needs can push the size too. If the island is about 24 by 12 inches or larger, it generally needs at least one GFCI outlet. Add a sink, and the layout gets more involved. Now you're dealing with new water and drain routing, which can change both the island's size and where it can go.
Yes - if your layout meets the clearance rules.
Keep at least 36 inches between counter runs. If two people cook at the same time, aim for 42 inches. Also check appliance swing. Oven, dishwasher, and refrigerator doors should open all the way without blocking the walkway.
In slab-foundation homes, adding plumbing or electrical to an island can get expensive fast. It often means cutting into the concrete, which adds labor, mess, and a more involved install.
It comes down to scope - mainly whether the island needs plumbing, gas, or electrical work. A simple island can go in without much delay. Once you add utilities, though, the job usually needs permits and rough-in work, and that adds time fast.
Homeowners should also plan for permit approval to take 2 to 6 weeks. After that, demolition, rough-ins, finish work, inspections, material lead times, and contractor scheduling can stretch the project out by several more weeks.
