
A backsplash job is not just tile on a wall. In Maryland, your price and timeline usually depend on wall prep, outlet cuts, moisture issues, trim details, and whether repairs show up after demolition.
Before you approve an estimate, make sure it lists the full job in writing. That includes demolition, disposal, wall repair, tile layout, cuts around outlets and corners, setting materials, grout, caulk, sealer if needed, cure time, and cleanup. In older Maryland homes, hidden wall damage can turn a small tile job into a repair job once the wall is opened.
What you should check first:
In parts of Maryland near the Chesapeake Bay and along the Eastern Shore, higher moisture levels can affect wall condition and material choice. Glass tile often needs a flatter wall than ceramic or porcelain. Natural stone may also need sealing and more upkeep.
The main point is simple: only compare bids when each contractor prices the same scope. That is what helps you spot missing labor, hidden costs, and weak estimates before work starts.
Get the scope in writing before anyone orders tile or trim. In Maryland, the proposal should come from an MHIC-licensed contractor.
A backsplash job can look simple at first glance. Then one missing detail turns into extra cuts, more labor, or a change order nobody planned for. The scope needs to spell out exactly what is and is not part of the job.
List the backsplash area in square feet. Then go a step further and note outlet locations, corners, finished edges, and any area behind the range.
Those details change the job in a big way. They affect how much tile you need, how much waste to plan for, and how much cutting and finish work the installer has to do.
A backsplash can turn into a bigger renovation when demolition opens the wall and shows water damage or mold. The same goes for plumbing, structural, or electrical code changes.
In older Maryland kitchens, hidden moisture damage often doesn't show up until demolition starts. That's where a small tile project can shift into repair work fast.
When you compare proposals side by side, check whether each item below is clearly included or excluded. A good estimate separates labor from materials and lays out the full scope of work.
| Scope Item | Included in Proposal? | Notes |
|---|---|---|
| Demolition & Disposal | Yes / No | Adds removal time |
| Wall Preparation/Repair | Yes / No | Adds repair time |
| Tile & Trim Materials | Yes / No | Confirm square footage and overage % |
| Setting material | Yes / No | Type should match tile material |
| Grout, Caulk, & Sealer | Yes / No | Sealer matters for stone and grout joints |
| Outlet Box/Extender Adjustments | Yes / No | Requires code-related adjustments |
| Final cleanup | Yes / No | Dust, debris, and adhesive cleanup |
Any blank line or excluded item can turn into an added cost later. Once the scope is fixed, wall prep and layout planning come next.
After the scope is set, wall prep and layout planning come next. Tile setting is the middle of the job, not the beginning.
In older kitchens across Salisbury, Wicomico County, and the broader Eastern Shore, backsplash prep can involve more than a quick patch. Homes with past flooding, leaks, or mold often need a closer look before any tile goes on the wall.
A proper prep process usually starts with shutting off power to nearby outlets, removing cover plates, protecting countertops and cabinet faces, and cleaning the wall surface. Then the real wall work starts: loose material comes off, low spots get patched, and the wall gets leveled so the tile has a stable surface to bond to.
If the original wall is beyond simple patching, new drywall or backer board may be needed before tile goes up. Tile won't fix an active leak or a weak substrate. Those problems need to be handled first.
Tile material changes how demanding the prep work will be. Ceramic and porcelain tend to be more forgiving. Glass shows every dip and bump, so the wall needs to be flatter. Natural stone often adds sealing and more upkeep.
That choice matters more than people think. On a wall that already needs patching or leveling, the tile you pick can change how much prep time the job takes.
A pre-installation walk-through is the time to lock in the project's parameters. Finalize the pattern, focal point, edge treatment, and outlet alignment before work starts. That's how you avoid delays, extra cuts, and wasted material.
Outlet locations matter because each one calls for precise cuts in the tile pattern. Where those boxes sit in relation to the layout can affect how clean the finished backsplash looks.
Once the layout is set, the installer can move into cutting, setting, and finishing the tile.
With prep and layout done, the install moves into the most labor-heavy part of the job. This is where the pace can change fast. Wall condition, tile type, and the number of cuts all shape timing. In Maryland homes, older walls, past moisture exposure, and walls packed with outlets can turn a simple-looking backsplash into a slower, more exacting install.
Installers set tile in a clear sequence so the pattern stays lined up across the wall. They snap reference lines, start from the main layout point, and work outward in stages. That step-by-step approach keeps spacing steady and helps the pattern track cleanly from one end of the wall to the other.
This is usually where the clock starts to stretch. Detail work takes time.
Cuts around outlets, corners, trim, and other obstacles slow the job because each tile has to be measured, cut, and test-fit before it can be set. The placement of outlets, plumbing penetrations, and corner joints within the layout has a direct effect on labor. If those features land in awkward spots, the install calls for more of that slow, careful work.
Once the tile is set, grout fills the joints and caulk finishes countertop edges and inside corners. Natural stone and some grout types also need sealing before the surface is ready for use. The last phase covers grouting, caulking, sealing where needed, and a walkthrough with the homeowner. In Maryland, that work is usually handled by an MHIC-licensed contractor.
The last thing to check is whether the estimate accounts for all of those labor details.
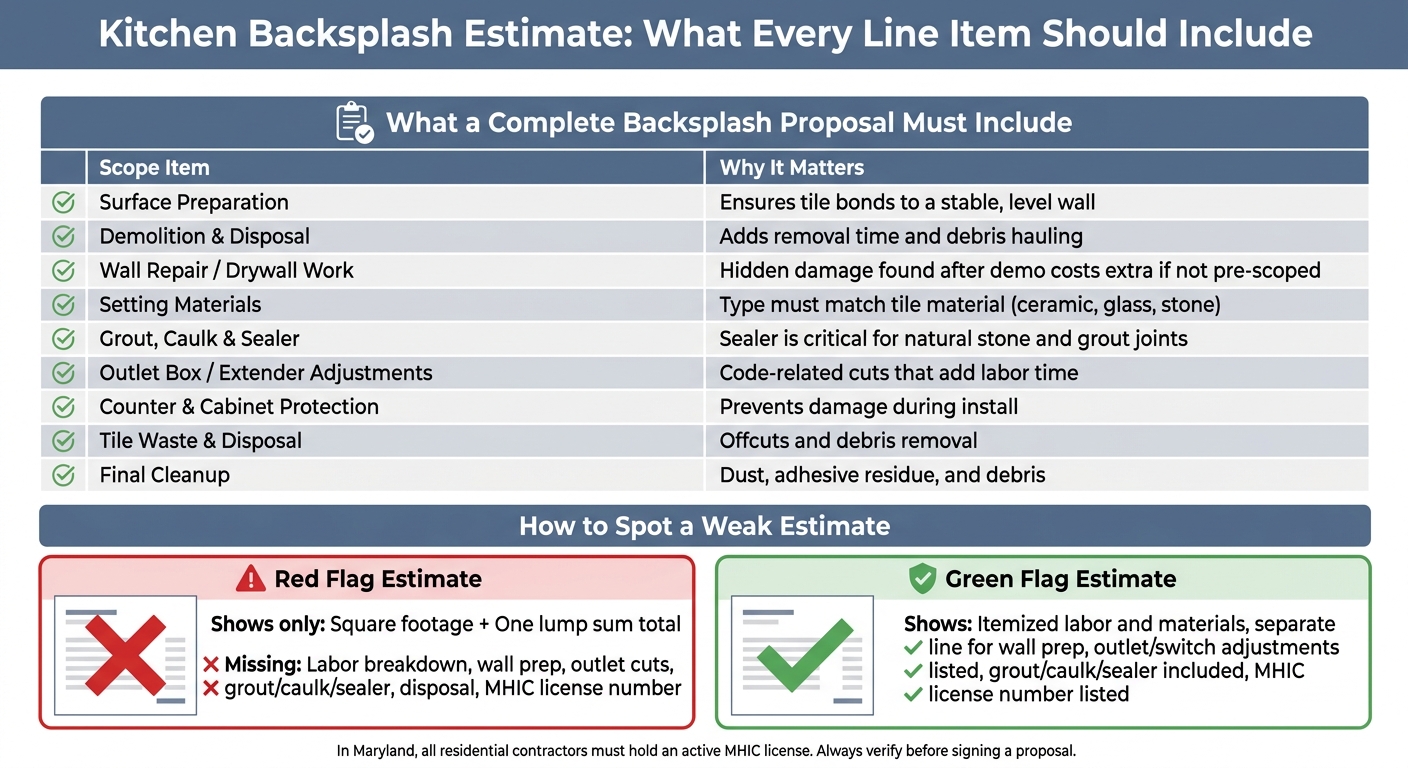
Kitchen Backsplash Estimate Scope Checklist: What Should Be Included
Once you know the scope, line each estimate up against it. That's the only fair way to compare pricing.
An estimate that shows only square footage and one total price leaves too much out. The real story sits in the line items: surface prep, counter and cabinet protection, specialty cuts, grout, caulk, sealer, and cleanup. If those pieces aren't listed, you're not seeing the full job.
Labor costs climb when the walls need repair or the installer has to make extra cuts for outlets and switches. That work takes time, and time is where labor costs move.
Those conditions should show up as separate labor items. They shouldn't be buried inside a vague lump sum.
A written proposal should break the work into clear line items, not one flat number. Look for:
In Maryland, the proposal should also list the contractor's active MHIC license number.
Those cost drivers should appear as line items, not assumptions.
Only compare bids after each one puts the same scope in writing. The right proposal shows what's included, what's excluded, and why the price lands where it does.
A typical kitchen backsplash installation takes one to three days.
The exact timeline comes down to a few things: the layout, the material you choose, and how much wall prep is needed for a durable finish in your Maryland home. A simple subway tile pattern on a flat wall moves fast. More detailed layouts, uneven walls, or harder-to-cut materials take longer.
Electrical outlets also add time. So does the drying time for setting materials and grout. That part matters more than people think. The tile may look done on day one, but the install still needs time to set up the right way.
Hidden problems can push the final price up fast. If the installer opens the wall and finds water damage, soft drywall, or rot, those repairs need to happen before any tile goes in.
A few other things can add to the bill too:
This is where simple projects stop being simple. Tile only looks good when the surface behind it is solid and flat. If it isn't, the prep work becomes part of the job whether you planned for it or not.
It comes down to the shape your existing drywall is in.
If it's still solid, clean, and dry, you can often tile over it. That's common in dry areas where the wall hasn't taken on moisture or started to break down.
If the drywall is soft, uneven, crumbling, or shows water damage, it needs repair or replacement first. Tile needs a stable surface. If the wall behind it is failing, the tile won't stay put for long.
Weight matters too. Heavier materials like natural stone put more stress on the wall than standard ceramic or porcelain tile. In those cases, a professional should check whether the drywall can handle the load.
